The Langeleik
 While I was searching for other string instruments that I could either build or put on a wish-list I came across a Norwegian folk instrument called a langeleik. This instrument was intriguing because of my interest in my Norwegian heritage, and it was difficult to find very much specific information about it. It seems that while it is popular enough to be written about there is very little technical information about it and only one online retailer that sells them.
At first glance the langeleik appears similar to the mountain dulcimer. The tuning idea is the same -- one melody string (or course) and a number of drone strings tuned to create an open chord with the melody string. For more general information check Wikipedia's entry for the Langeleik. If you'd like even more you can search Google.
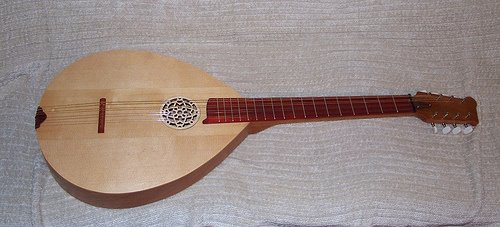
I decided that the langeleik would be my next instrument construction project. This would be quite the undertaking for me since no one sells langeleik kits and I had no luck finding plans for the instrument. With my knowledge of mountain dulcimer construction and a collection of the information I found online from various sources I started planning the instrument. Thankfully I had no trouble finding many pictures and learning about the rough scale length of the instrument. From there it was just a matter of building a box with tuning pegs on it. Here's my instrument specs:
- 8 strings. 1 melody, 7 drone strings -- 2 with floating bridges or capos.
- Melody string is fretted to play a major scale.
- Ebony tuning pegs are meant for a violin.
- The majority of the body is made from basswood.
- Bridge, nut and tailpiece are oak molding.
- A fine-tuner was fashioned out of a grounding bar for an electrical panel.
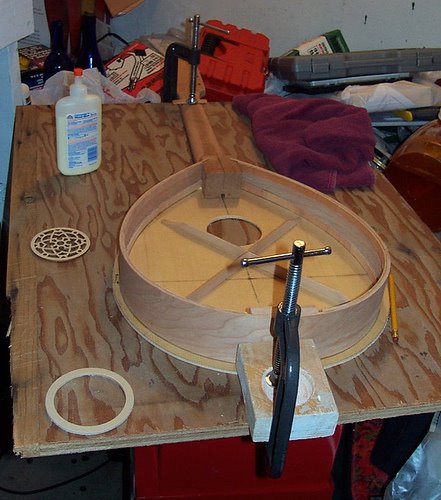
Since this was my first made-from-scratch instrument I decided I didn't want to spend a lot on ruining fancy wood. This was a prototype, if I liked it I'd build more in the future. That's how I decided on basswood - it was something readily available at a craft store in town and not very expensive in the quantities I was buying. If I decide to start producing these for sale I'd look into some other tonewoods.
 The most difficult part of construction was the peghead and that area could have used much more planning on my part. Ultimately I ended up with a functional, if not the most attractive, peghead. Constructing the basic shape and deciding how to connect it to the soundbox was one problem. The other was the decision to use violin tuning pegs and refusing to buy a peg reamer. A hand drill and a tapered round file made a suitable replacement but the tuning pegs could use more attention to make their operation work better. Now they serve their purpose of roughly tuning the strings and holding them in place. This is one area that I should have stuck with what I knew and gotten some geared tuners similar to the ones on my mountain dulcimer. They wouldn't have been as pretty but would have functioned much better.
Since my tuning pegs couldn't be adjusted easily I decided I needed to add a fine tuning device. My original design didn't take a fine tuner into consideration so there wasn't much space available on the instrument and that limited my options for picking something that was meant to be used for that purpose. Instead I sifted through my pile of spare parts and found a grounding strip. Not the most attractive item on the instrument but it makes it much less frustrating to tune, and that means I'll be more likely to play it. I think it's an acceptable lesson to learn on a prototype and something I'll take with me when I go on to design the next one -- or any other string instrument for that matter.
Overall I had a successful design and construction experience. This is my third instrument construction and my interest in building more has grown. I have a few ideas for my next project. Whatever it is I'll post about it here. Until then you can go look at all my photos of the langeleik.
posted by James at 6:56 PM
5 comments
![]()
![]()